Listen to the Episode
Vintage Sewing Machines Part 2 – The Asian Sewist Collective Podcast
Links
Patterns & Designers mentioned
Sandhill Sling by Noodlehead
Sofia Sweetheart Knit Dress and Top by Staystitch Patterns
Lola Racer Tank by Staystitch Patterns
Weiland Tank by Elbe Textiles
Fabric Stores mentioned
The Wasteshed, Chicago-based Creative Reuse Center
Resources
*Views and Opinions expressed by each author are theirs and may or may not be shared by ASC*
Sewing Machine History
The Sewing Machine: Its Invention and Development, Smithsonian Libraries
Sewing Machine, Wikipedia
Who Invented the Sewing Machine, ISMACS
The Singer Story Made in Clydebank, BBC
The Secret Life of Sewing Machine
How Singer Won the Sewing Machine War, Smithsonian Magazine
Treadle, Wikipedia
History of the Sewing Machine, Treasurie.com
History of Singer Sewing Machine Company, Singer.com
Wheeler & Wilson Co History, Connecticut History
Inventor Elias Howe Was Born, America’s Library
Japanese Vintage Sewing Machine
Japanese Sewing Machine Brands, Love to Know
Japanese Sewing Machine Clones, Vintage Sewing Machines Blog
Occupation and Reconstruction of Japan, 1945-52, Office of the Historian, US State of Department
What is Japanese VSM and How to Spot one, Vintage Sewing Machine Garage
Sewing Machine Features
Types of Bobbin Driver, Wikipedia
Slank Shank History, Singer301.com
Singer Knee Bar, Old Singer Sewing Machine Blog
(Image source: Old Singer Sewing Machine Blog)
Bernina Foot, Sewing Parts Online
Vintage Singer Feet Identification, Offspring Blog
Glossary for Vintage Sewing, Still Stitching
Japanning, Britannica
Japanning, ISMACS
Buttonholer foot
(Image source: Male Pattern Boldness Blog)
Ruffler foot
(Image Source: Yesterday’s Thimble)
Bernina Cone-Lever Presser Feet System, Bernina International AG
Bentwood Case, ISMACS
Sewing Machine Models Mentioned
Singer Featherweight, Threads Magazine
Singer 15, Singer Sewing Info
Singer 66, ISAMCS
Singer 201, SingerSewingInfo.co.uk
Singer 237, DragonPoodle Studio Blog
Singer 401A, ISMACS
Elna SU, Needlebar.org
Bernina 830 Record, Male Pattern Boldness Blog
Bernette 234
(Image Source: Sewing Machines Blog)
Bernina 801 Sportmatic
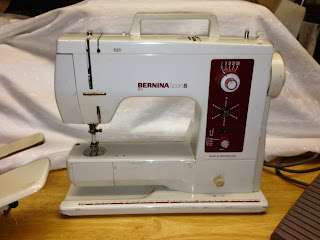
(Image Source: Urban Recylist Blog)
Books and Papers
Finnane, Antonia (2016). “Cold War Sewing Machines: Production and Consumption in 1950s China and Japan.” The Journal of Asian Studies, 75(3), 755-783.
Bobbin Tension Correction
Bobbin Tension Videos, Archaic Arcane
Restoration Booklets
Guide to Refurbishing Hand Sewing Machine, Tools for Reliance
The Sewing Machine Master Guide, From Basic to Expert, by Clifford L. Blodget (2013)
VSM Restoration Starter Guide
Where to Buy
Garage Sales
Local reuse restore or thrift shops
Facebook Marketplace
Estate Sales.net
eBay
Kijiji
ShopGoodWill
Identify Models Information and Finding Sewing/Service Manuals
International Sewing Machine Collectors Society
Identifying Vintage Sewing Machines, Threads Magazine
Visual Guide to Identifying Singers, Vintage Singer Sewing Machine Blog
Restoration Starter Toolkit
Sewing machine oil and grease for oiling the machine
Screw drivers for disassembly
Cotton swabs, chopsticks, toothpicks, etc for getting into the nooks and crannies
Soft paint brush or make up brush for picking up lint and dirt
Soft cotton rags for cleaning and polishing
Metal brush for cleaning
Metal polish for polishing metal pieces
Degreaser for removing old oil
Rust remover (if rust is present – don’t forget to oil after removal to prevent oxidation)
Dremel tool (optional) for polishing
Hair dryer (optional) for softening old oil
PB Blaster (optional) for really, really stuck pieces
Tajima thread tension gauge or Singer featherweight bobbin tension meter (optional) for adjusting bobbin tension, if needed
Organization bins or bags for keeping track of parts
Phone for taking pictures of how parts are put together prior to disassembly
Other Cosmetic Restoration Equipment (Not sponsored)
Boiled Linseed Oil + Shellac for French polishing
Singer Touch up Paint Singer Featherweight Shop or Make your
Show transcript
Nicole
Hello, Persephone’s pants probably not as pretty as Pomona pants.
Ada
Oh Pomona pants.
Nicole
I don’t know if either are pretty or not but just looking for P’s.
Ada
Ada: Welcome to the Asian Sewist Collective podcast the Asian Sewist Collective is a group of Asian people from around the world brought together by our shared appreciation for fiber and textile arts, and our desire to see more Asian representation in the sewing community.
Nicole
In this podcast, we explore the intersection of our identities, and our shared sewing practice as we create a space for Asian sewists and our allies.
Ada
I’m your co-host, Ada Chen, and I’m recording from Denver, Colorado. Denver is the traditional territory of the Ute, Cheyenne and Arapaho peoples. I’m a Taiwanese-American marketer turned entrepreneur and these days you’ll find me running my own natural skincare business called Chuan’s Promise. That’s C-H-U-A-N-apostrophe-S promise – and sharing my marketing tips on my blog. Most importantly, for this podcast, you can find my sewing at @i.hope.sew on Instagram.
Nicole
And I’m your co-host, Nicole. I’m based outside of Chicago, the original homelands of the Council of the Three Fires, the Ojibwe, the Potawatomi, and the Odawa people. I’m a Philippine-American woman, a lawyer by day and a sewing enthusiast the rest of the time. You can find me on Instagram at @nicoleangelinesews.
Ada
Hey, listeners. In our last episode, we talked about the history of sewing machines a bit about vintage sewing machines and how to find them. Today we’re continuing that discussion with more details about vintage sewing machines and a conversation with our producer Esther about her experience restoring these machines. Esther has a lot of helpful tips to share from firsthand experience and it was great to get her on the other side of the mic. We hope you enjoy!
As you search for your vintage sewing machine, we are of the opinion that brands are not really as important as the functionality of the machine, and how easily you can find parts to fix the machines If any parts are required. That is now or in the future. Singer is probably one of the most recognizable brands especially in the US they have a range of machines that are considered vintage collectibles like the classic Singer 15, one of the first models that resembles a modern sewing machine, and it was in production for over 100 years. Then there’s the ultra popular featherweight that we’ve mentioned which was known for the compact size and power and the Singer 201 and of course, the 237 that we mentioned earlier, and Asian Sewist Collective member and researcher Erica notes that because Singer produced such a large number of machines. replacement parts for the Singer machines can be the most easy and affordable to find, whether you’re looking for vintage Singer parts that are authentic vintage Singer or new aftermarket parts. Beginners might find it more helpful to stick with brands like Singer that have a lot of machines produced over time and manuals readily available as well. For folks who are interested in historical sewing machines and might be more interested in treadles or hand cranks, which are relatively simple in their mechanisms, but accessories like bobbins might be trickier to find for these machines. A few names that you might hear if you’re buying a treadle other than a Singer of course are White, Wilcox Gibbs, National and New Home. And these companies have either been bought out or gone away over the years. Non US brands like Pfaff from Germany, Elna and Bernina from Switzerland have also gained a reputation as well engineered sewing machines that many are looking for. It’s also probably worthwhile to note that Elna was absorbed or bought by Janome in 1995. So modern Elna machines are likely not manufactured in Switzerland. And obviously, this is just a very short list of the brands available in the vintage sewing machine world. For a longer list again, check out the ISMACS website.
Nicole
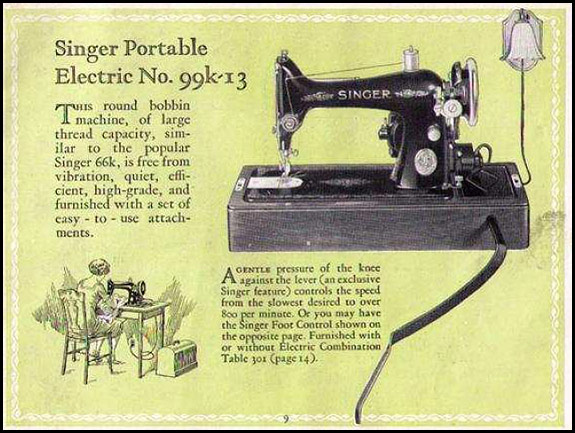
Sometimes you’ll see models in bold colors, not the traditional black ones with retro finishes. Common colors are eggshell cream, light pink, mint, or light blue. I like the sound of a mint sewing machine, that sounds like fun. They are fun and interesting compared to the standard white machines that we’re so used to today. If you can find quote “J A” or quote “made in Japan”, or somewhere on the machine. These are most definitely Japanese made sewing machines from the 1940s, 50s and 60s. Following World War Two and the occupation and reconstruction of Japan, the US encouraged the Japanese manufacturing industry to provide sewing machines based on Singer’s model 15. Japan’s manufacturers later captured a huge portion of the market through making well built affordable machines while improving the technology. You may find some people referring to these vintage Japanese sewing machines as quote unquote clones of the sewing machines made in the West. But the term clones are just something less authentic than the original and this is sometimes construed as an insult to the Japanese people behind the production of their machines. In reality, many of these vintage Japanese sewing machines are not exact carbon copies and sometimes were manufactured with better engineering, making the sewing machine a smoother machine overall. And many regard these constraints as a very well made and durable
Ada
Vintage Japanese sewing machines are branded under a variety of different names. And so the same model could have been branded under several different names. It’s a practice that is still used in lots of different industries today, and this was because Japanese manufacturers would produce the machines and then rebadge them and rebrand them as store brands or other names so that they could sell them in an English speaking market. However, some brands that still remain today – you might have heard of them – are Juki, Janome and Brother. So Juki was founded in 1938 in Tokyo and began manufacturing sewing machines in 1945. Juki is well known in the industrial sewing machine world and they released their first industrial sewing machine in 1953. Janome, or if you pronounce it the Japanese way, Janomé meaning the eye of the snake, was established in 1920 and named after the round bobbin technology that the company sells. They claim to be the first company in Japan to sell sewing machines with round bobbin technology. And later in 1960 they acquired New Home which is a brand we mentioned earlier, and New Home had sewing machine manufacturing origins dating back to 1860. Brother began as Yasui Sewing Machine Company in Nagoya, Japan in 1908. The founder Kanekichi Yasui repaired industrial sewing machines and then manufactured sewing machine parts for his local community. The company was renamed Yasui Brother Sewing Machine Company later when his sons launched the first Japanese manufactured chainstitch sewing machine into the market around 1928. The Brother name, so they kind of chopped it, came about when the company was trying to expand internationally.
Nicole
I have a Brother, well, I have a Brother machine. I had no idea that Brother was a Japanese company so that’s really cool. And for beginners who are just starting to dip their toes into vintage sewing machines, we actually recommend not starting with Japanese vintage sewing machines. While they are readily available and cheap today, there are a lot fewer resources available to aid with restoration. For example, sewing machine manuals and service manuals may not be as easy to find as Singers, as they are, Singers are listed on the website. There are also fewer tutorials available and therefore may require more tinkering abilities that someone like me does not have. So if you’re just getting started, maybe Japanese vintage sewing machines aren’t for you. The parts could also be harder to find because like we said earlier, there are many machines that look similar but are badged under different names. And there isn’t an explicit parts list from the company that’s readily available. Japanese vintage sewing machines would probably be best for someone who has done some sewing machine restoration and knows which parts may be interchangeable with other brands. And speaking of let’s dive into another selection consideration which is you know, how easy is it to source parts like bobbins, needles, presser feet, you know, does the machine come with accessories? Or are they harder to find like bobbins that fit vintage machines.
Ada
So for bobbins there are different bobbin mechanisms and types. And in general, you’ll see like two shapes. The first one is round ones that we’re pretty familiar with. They’re either drop-in like the ones that we’re used to on modern machines. These days, we’re front slash side loading. That second type is a long cylinder with round discs at both ends, usually placed inside a bobbin shuttle. A bobbin shuttle is a hollow long cylinder with an open end on one side, and it comes to a point on the other. The shuttle is used to move forward and backward linearly or along an arc. And these are usually found in vintage machines that date back to around the 1850s. And as you can imagine these older Bobbins and Bobbin shuttles may be harder to find if they don’t already come with a machine, also, like they’re just so easy to lose because they’re so small. So you can imagine that over the years, you know, they might have just dropped out in transit or something and replacing them can be kind of a pain. So in general, if you have a vintage machine that takes let’s say a class 15 bobbin, which is the very generic bobbin that most modern machines use, the VSM community recommends using a metal bobbin over plastic bobbins of the same model, especially for models, pre the 1960s or 70s.
Nicole
When it comes to presser feet, there are generally three types of shank heights to be aware of high, low, and slant. These different shank heights reflect how high or low the presser feet attachment points are with respect to the needle throat plate.
If you buy a machine that doesn’t come with presser feet, you want to make sure you get the correct feet designed for the shank height of your machine, otherwise, you’re not gonna be able to sew. Pfaff and Bernina have their own proprietary high shank that’s slightly different too.
Ada
Right. And in the case of Bernina they have quote unquote old presser feet and quote unquote new presser feet. This is because they change their shank system in 1996 so machines that were made before that use old feet, machines made after that use new feet. I learned about this when I was looking for a rolled hem foot for my machine and it uses old presser feet because it was made before ‘96. And this knowledge has come in handy when I’ve ordered a walking foot, gathering foot like basically like adding on all feet, both of which – those two specifically – are very useful for my sewing practice. And I also just lucked out that my machine came with all the original feet, thank you original owner or whoever came before me. But if you find a machine that doesn’t come with all of his original feet, you’ll probably want to look into buying replacements besides just your regular presser foot, you might want a zipper foot and all of these other things buttonholer you know to make sure that you can sew the things you want to sew with it. So it is important to consider presser feet in your purchase. To that end you can actually find tons of presser feet online and I would be lying if I didn’t say it was tempting to collect all of them before they kind of disappear into the ether, if you like me sew with Bernina there are helpful guides online to help you convert between old and new presser feet identifying numbers and codes because they change those too. And to help you understand which machines use which feet. Unlike a Bernina presser foot which has a high shank and cone lever locking system, which is the best way I can describe what this looks like, and we’ll include photos in the show notes, modern day sewing machines use snap on feet. But those still fall into either the high or low shank category. For those who have a machine like mine that are Bernina, the cone-lever locking system is how we attach the presser foot via a matching hole, kind of like ball and socket on the presser foot to the small cone shape on the bar secured by the lever so it locks in. But different from that, you know Brother machines, for example, have a low shank, while a Kenmore machine might have a high shank. So usually, if you’re using snap on feet, let’s say you have those two different brands, it is still possible to use snap on options, you’re just going to have to find some sort of snap on adapter that works with your selected vintage machine. So it sounds really complicated, but all that is to say, look at your machine, check what kind of presser feet it will take and check that those are the ones that you will be using and if they aren’t or you’re gonna need more, see how available those are.
Nicole
Last but not least, the slant shank features a needle bar and presser foot bar that angles toward the sewist. Imagine the side view of your sewing machine, instead of the needle bar being perpendicular to the throat plate it’s angled such that the tip is, the tip of the needle is pointing toward the front of the machine for an easier view of what you’re sewing. Youtube folks can see me making hand gestures that our producers – Oh yeah. So slant shanks were popular in the 50s with the Singer 300 to 700 series, and they were an attempt for the Singer company to stand out from the competition. The idea behind these machines were also for educational and marketing purposes. According to Singer 301 dot com, quote, Singer felt that the education system would produce a new generation of sewers raised on a slant shank or slant needle sewing machines end quote. Unfortunately, this configuration did not become popular. The presser feet are still available online because there were many of these machines manufactured but there is no substitution. Other useful vintage presser feet accessories for sewing machines that are also shank dependent include buttonholer and zigzag attachments. Back when machines could only do a straight stitch. These attachments were made such that the machine could do more. It was only starting in the 60s that a few sewing machines could do a built-in buttonhole.
Ada
Now that we’ve gone over some of the basics about vintage machines let’s walk through the actual process of restoring one. While I have some experience doing this we thought it would be best to invite Collective member and producer of this episode Esther on to share her personal tips and experience on restoring a vintage sewing machine.
Nicole
Esther has restored two vintage sewing machines, a Singer 66 with treadle cabinet and a Singer 401A. I heard there is a third on the way and welcome to the other side of the microphone, Esther! Can you please introduce yourself to our listeners?
Esther
Hi, I’m Esther, I use she/her pronouns. My home base is in Hampton Roads Virginia. I’m an Asian American with roots in Hong Kong. I’m an engineer by day and a crafty troublemaker all the time. I like to sew garments and am usually really intrigued by pattern making and tailoring methods. You can find me on Instagram @esthermakesadventures.
Ada
And Esther has been part of the Collective since the beginning. And we’re so happy that we had to pick your brain a bit about all the ins and outs of vintage machine restoration. I know I have personally done this. So, Esther as we know, before, we’ve talked a bit about finding machines today. Do you have any other tips for searching for a machine that we haven’t covered yet.
Esther
So I want to start off and acknowledge that I’m not a VSM expert in any way. But it was just a very interesting rabbit hole that went down during the past few years being stuck at home. And so as a result, I have a much deeper appreciation of the engineering ingenuity of sewing machines. That said I can really only share my very limited experience of looking and restoring these machines. So far, I think we’ve covered quite a bit on finding machines,
I have two other things that I would like to bring to our listeners’ attention. First, in the age of rising scams, we want to provide a few tips on how to prove the seller indeed does have the item that they’re selling. So some tactics include asking the seller for additional photos or videos, specific details of the machine, or maybe even a written note of their name and the date if that’s possible.
Nicole
Other tips that the Collective members have tested were to make sure the selling platform has Buyer Protection and perhaps reverse Google Search images to see if someone lifted off the images from legit listings, which is kind of a good tip for anyone buying secondhand online and Esther, what’s the second thing our listeners should look out for when shopping for machines.
Esther
The second thing is to look out for people listing the machine incorrectly as industrial strength when they’re just domestic machines. So beware of wording like ‘heavy duty’ or ‘sews leather’. I mean, you could say that vintage sewing machines are sturdy from like a longevity perspective. So when they’re operating under their design conditions, they’re sturdy because they can sew for a really long time. They’re designed for daily sewing that occurs in the regular household being regularly maintained. However, the vintage sewing machines that we’re talking about in this episode are mostly not designed to sew leather day in and day out. There are of course vintage industrial sewing machines and specific leather sewing machines. But that’s not the focus of this episode. Fun sidenote, when I was researching which machine I wanted, I stumbled upon a series of blog posts that outlines how to identify vintage black Singer sewing machines. Even when the pictures are poorly lit and totally out of focus, which you know, are usually the photos that you see when you go shopping online. We’ll link in the show notes if you’re interested, I just think that being able to identify the machines before the seller gives you the model number to verify is kind of helpful. But a fun game I like to play too, spot the machine.
Ada
And what do you recommend doing when you actually find a machine in real life and either you know it arrives at your doorstep or you go to pick it up.
Esther
So when you do get a chance to see the machine in person, you’ll want to get a general idea of what condition it is in. And you want to also note any missing parts, a lot of times, they’re just stuck and just needs a good drink of oil, you know just don’t have the expectations that it’s going to run, definitely don’t force it if the machine wouldn’t move, just because you could risk damaging the internal parts if you do force the balance wheel. You may also find it helpful to ask the person selling the machine where the machine was sitting or when it was last used. I mean, you probably have a good idea of what condition a machine is in, if it was kept in the house and like a nice conditioned location versus outside a barn and torrential rain years after years.
Nicole
The condition of the machine does make a difference in how long the restoration process goes. Right? Like it’ll affect how much we’re gonna pay for it as well. So what kind of prices can our listeners expect to spend on a vintage sewing machine?
Esther
Right, so depending on where you are in the world, price point can be wildly different. So whether you are looking to buy a machine to fix up, I would really recommend avoiding antique dealers who are selling at outrageous prices. And those are, especially from as is conditions unless that’s what you want, you know, for decorative purposes. But that’s not why we’re here today. So there are a range of conditions on the market from neglected for decades to restored partially or you know, to good enough. And also to the pristine condition. I know that in some areas in the US, you might be able to get popular Singer models without shipping under $100 in quotes mystery condition. So both my Singer 401A and the Singer 66 were in the range of like $60 to $75. And I actually bought both in the last two years, some of the top of the line Bernina, Elna, Pfaff ones tend to retain their values. So you can actually expect them to start around $300 plus up to like $800 or $900. Cost can be really unpredictable depending on where you’re located. I would also say don’t be afraid to negotiate, especially if the machine you want is in a worse condition when you see it in person. And I feel like sometimes the person selling it knows that it’s a vintage machine and they want to kind of upsell you. But if you intend to restore it and everything you should consider negotiating to knock the price down just a little bit. Because you don’t know how much you’re going to put into buying the parts to repair, time and energy that it’s going to cost you to get the machine up and running. So I think we’ve mentioned before that cost of replacement parts varies widely from a couple dollars to $100 plus for a critical part to trust the seller, that they’re honest about the condition or you know, sometimes you just have to bite the bullet and pay more from a more trusted seller
Nicole
That’s so hard with buying things for me. I would rather just pay more from someone that I know when it comes to something that I don’t have any expertise in, like I know that they’re more trustworthy. Another thing that you mentioned, made me think of just growing up was the negotiation part. That would be hard for me. I think like I remember being in places and my grandma would be there and these are like, this isn’t like serious. This is like at markets and stuff and she would be like, no, that’s too high. Because XYZ, how about this and she would go back and it was so embarrassing. I hated it. But if I could get my grandma to come with me now to talk to a Vintage sewing machine seller, I would love that it just made me laugh and like brought up a good memory of a family member that has since departed.
Esther
Yeah, when I went to attempt to negotiate, I really only knocked off like $5. It wasn’t really that spectacular. I know negotiation is in my blood. I’m Asian, but you know, I was also kind of like, not good at it.
Nicole
My grandma would be so disappointed it was more stressful to like, it’d be more stressful to knock off the $5 than just pay the $5, that’s funny.
So now once you have a machine, let’s say you came in at under your budget because you’re like my grandma, and you kick a lot of butt at negotiating. So what now? What if the machine had some issues, but you know, you decided to take it anyway?
Esther
That’s a good question. So you don’t always know what the real issue of the machine is until you really take it home and take it apart to look at it. Some machines require a deep cleaning and new sewing machine oil or grease and then it will go back to running perfectly fine. Some machines may need some new wiring, some may have missing key parts, broken external parts. Some may have internal parts that need to be repaired. Or sometimes it may have thread nests that need to be taken out or like a surprise find an abandoned rat’s nest. I’ve heard horror stories. I know it was so gross. It’s truly difficult to quickly predict how long it’s going to take for you to restore it if it’s currently not working. It could take you know, timewise a few hours to you know, months. So, with experience honestly looking at the issues and diagnosing the problem often get a lot easier. And your time invested in the cleaning and the dismantling on the machine will also vary greatly depending on how far you’re willing to go with taking the machine apart.
Ada
One important note about electrical safety here because we’re primarily talking about vintage machines you can plug into the wall, make sure you check that all the wiring looks intact, nothing’s bitten through it. It’s not broken, if there’s cracks or crumbling bits then make sure to address those before plugging in the sewing machine. The original wiring for machines like black Singers from back in the 50s or earlier, is not safe to put directly into the nearest power outlet in your modern house because they’re not grounded, and they will likely need some new wiring or rewiring. This was certainly the case in my 100 year old Singer 66. It arrived in a case that had clearly been built for it out of laminate and particleboard and wood glue, had a vinyl overlay too, something had gotten into the wood though so it smelled. And the wiring. It was fraying but it was just really, really sketchy. And I did not feel comfortable plugging that in anywhere, you know, electrical fires, sparks, those are all dangerous. So be careful. And instead of plugging in the wiring on mine, because the wiring was only connected to the motor house on the outside of the machine that was then turning the crank on my machine through a belt, I just decided to buy a completely new motor, I unscrewed that original motor off and with its old wiring and got rid of that. And I spent about $40 on a replacement motor. It had a similar power level to the original, but obviously all modern wiring and a new plastic pedal. And when it arrived, it was really easy to just screw that on where the old one had been. And honestly the most stressful part of doing that was getting the right belt, because that was a separate purchase and getting that tension correctly calibrated. So it wasn’t the wiring part that was stressful for me. $40 It’s definitely on the cheaper end for a small motor. So I took it slow and made sure that no sparks were flying, but it did end up working. And I still have the option to put on a hand crank if I ever want to go truly electric free and manual.
Esther
Yeah, that’s an excellent point. Safety first guys. Now that you have your machines in your hand. So first, you’ll want to acquire some sewing machine manuals and service manuals, especially the service manuals. If your machine doesn’t come with a manual, Google can help there’s so many resources on the internet. I think we’ve mentioned ISMAC’s website several times by now, they do have a good collection of manuals. Another option is to join Facebook groups that are specific to vintage sewing machines or the machine models that you have. You can also try finding them on archive.org, which is a free site that has publications that goes way way back.
Nicole
Now we don’t often know where a machine has been before it comes to us. And since it’s not in a new box, should you clean it and how?
Esther
So depending on what condition the machine you bought is in, I’d say most of the time you do want to clean the machine, especially one that is obviously covered in dust and decades old of grime. But there’s no need to break out any bleach or strong household chemicals. Think like old t-shirt, soft rag, that’s really all you need. Some restoration folks would recommend using a sewing machine oil that doesn’t have alcohol in the ingredients to remove the dirt and grime. But I’ve also seen suggestions of using kerosene as a cleaning agent. That to me sounded a bit dangerous like it was going to like my house on fire. So what I ended up doing was just using some water. I think a main suggestion here would be to really test it out in an inconspicuous spot just to see how it goes at first. And also be mindful of any decorative details that you have on the machine as you’re wiping because they tend to be really sensitive to alcohol compounds and could either disappear or silver depending on how much of the surface finishing is left. Also think about the makeup of the finishing. So this finishing coating on the sewing machine likely changed throughout time. So make sure to test and clean carefully. And if you choose a machine with some minor rusting, it would be a really good idea to remove the rust to the best of your abilities and oil it up to prevent further oxidation.
Nicole
So it sounds like a gentle but thorough deep clean is in order. So what’s next before you start sewing with a vintage sewing machine.
Esther
Sometimes what a stuck machine needs really could just be a nice drink of oil. The manual will tell you where the oiling points are and I always find it helpful to oil the machine first to see if they’ll budge. If it does move. You really are just you know halfway through to sewing. Just don’t force it to move. There’s a difference between wanting to move with the oil versus you actually putting force on it. So you have the option to keep the machine internal parts as is and just do it very light cleaning. Or you can be crazy like me and take it apart to clean as much grease and gunk out as possible. So light cleaning looks kinda like removing decades old lint, dust and grease on your needle bar, your presser foot bar area, your bobbin area. And even you know underneath the machine, I personally found it really helpful to disassemble and just clean out the bobbin hook area, just because there’s usually lots of dust and lint and old grease that once you do clean will make your machine sew that much quieter, and also smoother. I find that to be the case with my 401A. And it just really so it’s so much smoother and quieter. Plus, you actually do gain a new appreciation of how this machine in front of you works. So a caveat there, if you’re going to take your bobbin hook area apart is that you might have to retime your machine. And that’s totally doable. And you just have to get your hands on a service manual. And if you’re more of a visual learner, I recommend looking on YouTube, there are a lot of VSM enthusiasts on YouTube that will show you how to reassemble some of the more popular machines, which is also why we made the suggestion earlier for beginners to look at machines that are more popular as they tend to have more resources, documenting their restorations.
Ada
And we’ll link some tutorials in the show notes, I definitely have the same problem of oiling the bobbin hook and have that was actually the reason that I had to take in my Bernina for the first time to shop because I didn’t know how to get back there and I couldn’t find any videos on it. And so now that I’ve done that once, I pretty much paid the same amount for the services as I did for the machine, but they helped educate me on how to keep it going and ongoing maintenance. She drinks oil like no other and I pretty much need to oil her like I said every other week and I try to do it more often than that whenever I sit down for a project as well, just to make sure that everything’s running smoothly. Now obviously Esther, you and I are comfortable with opening up our machines. But would you recommend that everyone do this like what if you are afraid of opening up a machine.
Esther
I hear and I understand your fear, but you can do it. I promise you can do it. And know if you do choose to take the machine apart for a deep cleaning or to take a look at issues make sure please take tons and tons of pictures, all angles, lit, not lit. You do not want to forget where you know this teeny tiny little set screw goes when you do have the time and energy to put it back you know seven months later after this assembly, ask me how I know! I do find it helpful to also have a large organizational area. So what I did was I had a large baking sheet and like little containers with labels of what sub assembly these parts need to go back together to. I used a bit of degreaser and metal polish to clean a lot of these parts with the soft rag. You’ll find cotton swabs or toothpicks or a chopstick helpful and trying to pry some of the lint and dust off. Some people will find metal brush helpful as well. I’m very lucky that I have a dremel tool in the household. So I was able to use it to polish parts like the throat plate and slide plate that actually does return the shine. It is really pretty shiny. Now, you know if a dremel tool is out of reach, you can definitely just use a rag and some elbow grease totally doable, not as fast. When you’re taking apart the machine do take care in removing the screws and try not to strip them. A lot of these screws are likely custom made. Granted, if you do have a little bit of engineering know how you could probably figure out the specs of the screw, CAD it up, send it to a machine shop to have it made. You know I credit this part to my partner who’s also an engineer. He knows all the things and there’s no problems, only solutions.
Nicole
So it sounds like a basic toolkit for diving into machine restoration includes the correct size screwdrivers, cleaning rags, cleaning tools like cotton swabs, or toothpicks or chopsticks to get into like little nooks and crannies, surface cleaning agent, metal polish degreaser and sewing machine oil and grease. And it’s helpful to be organized about the disassembly process, which is something that I was saying like that’s where I would screw up for sure. And it is also helpful to have a bonus tool like the Dremel tool. So got it. What about parts, like if you open up a machine and find there’s a missing or broken part.
Esther
There are three primary ways to buy parts to refurbish a sewing machine. The first way is to buy directly from an authorized reseller. So companies like Bernina, Janome, Elna, Baby Lock, they’ll always have supply parts. But then they’re only available for a fixed number of years for any given model machines. So if you do go back to an authorized dealer 10, 20 You know, in the vintage sewing machine case, 50 years, a lot of these parts are no longer available. Second way is to find parts from a donor machine, which is a machine of the same age or model, which has been stripped off the parts to be able to restore other machines. There are sellers who specialize in these vintage parts. Your last option is to buy aftermarket parts made by a third party. And these are generally made in China, not branded and may not work as well. As you can imagine, quality may differ from the original part. And they’re generally quite inexpensive. These parts are really popular to buy because of the price. And it’s usually the most accessible ones. A lot of people do rant on social media about the Made in China, when they’re talking about these parts, kind of like what you were talking about Ada in the Facebook group. I’ve been fortunate enough to not really need parts from this last option. And it’s mostly because the machines that I chose were popular and a lot were produced, which means more original parts are likely available in the market for restoration.
Ada
Definitely worth considering all those options. So you’ve pulled your machine apart, you’ve cleaned it as thoroughly as you’d like and you’re putting it back together. Now it’s ready for sewing right?
Esther
You can just start sewing once the machine is back together after you’ve done the degree of cleaning that you want. Whether it’s the light cleaning, or the full scale deep cleaning of every part possible. If you’re not familiar with the machine, now would be a good time to learn how to thread the machine, test your stitches, get to know the temperament of your vintage sewing machine. You may find issues that you’ve overlooked or need extra attention. For my Singer 66 once I was more competent with treadling and started sewing with it, I noticed that the stitches just came out so terribly unbalanced. It looked like my bobbin thread was just way too tight. And no matter how much I increased any tension, it just wasn’t looking any better. So long story short, I found out that the spring behind the needle tension assembly was slightly off, and therefore the whole tension disc assembly was just not engaging at all. Sidenote, when you do test out the stitches, you should check that your machine is functioning properly, it’s also wise to check that the bobbin tension and your needle tension are operating correctly in quote, factory setting. This is generally where your service manual will come in handy. Most of the bobbin tension is controlled by a very small screw on your bobbin case, or a bobbin shuttle. Usually it’s attached to a spring, which looks more like a lever. And that spring needs to be engaged properly when you’re inserting a threaded bobbin. So mechanically, this spring looks a bit like a lever, and you usually will feel a small click when the bobbin thread is engaged. So how would you control the bobbin tension, you just turn this little screw to either loosen or tighten it. So in this case, the phrase, righty tighty, lefty loosey really helps. I myself, I’m no expert in bobbin tension just because quite frankly, I am scared of it. But I do know that you can fix it. And it’s not the end of the world. If you do fiddle with it, there are ways to correct it and change it back. I just haven’t had any issues with bobbin tensions at all so far, I got really lucky. Here’s some advice from Erica who has done this before. To start testing you will want to use a fresh needle according to your manual. For instance, my 401A asked for a 16 size needle for calibration. And also you may want to use two layers of quilting cotton or a similar medium weight cotton to test your tension. You may find it helpful to also use two similar thread weights but in different colors. That way it’ll be easier for you to spot the tension issues whether it’s the needle thread or bobbin thread.
Nicole
There are two methods of testing, one is the quote yo-yo test and the other relies on a gauge. So here’s what Erica, a member of the Collective has said. If your machine has a removable bobbin case, one can do a yo-yo test and dangle your bobbin in the case for about five inches of thread, if every time you likely jerk your hand up your bobbin case drops another one or two inches then you’re good to go. bobbin tension is about right. If your bobbin case does not drop at all, your tension is too tight and if it drops more than two inches, your tension is too loose. So Erica generally turns the screws in about five minute increments a five minute on like an analog clock, and to figure out where the sweet spot is for the bobbin tension. And if your machine doesn’t have a bobbin case, and you haven’t yet developed a feel for how the bobbin thread should feel as it’s pulled through the tension guide, then you can use a gauge. The Singer featherweight shop sells one which Erica hasn’t used before. Erica has used a gauge made by Tajima. A recommended order of check tension is first. make sure the upper tension assembly is clean and in proper working order including any broken parts replacement as necessary. Then adjust the presser foot tension. After that adjust bobbin tension, then adjust upper tension as per your fabric. She recommends looking at service manuals whenever possible, and also the book The Sewing Machine Master Guide, From Basic to Expert, by Clifford L. Blodget (2013). And we’ll link that in the show notes along with a couple of links on bobbin tension adjustments.
Ada
I’ve never – I’ve also like Esther never had any major issues with the bobbin tension on mine. So we will definitely link some resources on how to correct bobbin tension in the show notes. And let’s say the machine sews properly and it functions as intended but maybe you want to restore some scratches or chips in the machine, what can you do maybe for the aesthetics of your machine.
Esther
So depending on the machine, you have the options of matching paint color at an auto body shop, you can mix your own using dyes, or you can just buy it off the shelf. Last time I checked, I’ve only seen the classic Singer black in off the shelf availability. I know that there are also a couple shops out there that specializes in repainting your vintage sewing machines so you can have whatever color sewing machine you want. Just as long as you’re willing to spend the money. You can definitely also return the japanning which is the black coating on the vintage Singer machines, especially if the coating is a shellac, you can actually polish it back to a shine. There is a technique called French polish. It’s very similar to the woodworking one except without the sanding. So what you do is you gently clean off the dirt and grime on the machine. And then you use a combination of boiled linseed oil and shellac to gradually build up the many layers of shellac backup just as a protection layer. I actually haven’t done that with my Singer 66 yet because it’s so time consuming. And you do need to have a workspace for it. You know you’re supposed to polish on several coats with a soft cloth and you let it cure for two to three weeks. And then you basically rinse and repeat, do it again and again again until you’re satisfied with how it looks. I mean I’ve seen before after pictures online and they really do look amazing.
Nicole
So I just want to back up and address the term japanning because I didn’t know what that meant when we first started working on this episode. And according to Britannica Japanning is a decorative arts quote process popular in 18th century Europe for finishing and ornamenting wood, leather, tin and paper mache and imitation of a celebrated lacquer work of the Japanese. Black Japan, which is among the most widely used traditional Japanning materials is a mixture of malt and asphalt, natural resin varnishes, drying oils and turpentine having a clear brownish undertone. In essence, a layer of this mixture is applied to the sewing machine baked in a very hot oven and repeated several times before ornamental decorations and varnish layers are applied. There is a very detailed article about this process of applying Japanning to sewing machines which will link in the show notes below. So Ada’s Singer 15 she said comes with decals that, you know, are almost like paint like what about those types of decals.
Esther
So some of the ornamental decorations are actually hand painted. And you’ll notice that these beautiful gold decals really stand out against the black Japan that we just talked about. So if you do want to touch them up, you can use a matching color and hobby paint or permanent markers or spray paints just to get the right color to touch it up. Another option is waterslide decals. They actually remind me of the temporary tattoos where you wet the machine surface and then you position the decals. When you’re happy with the placement, you then slide the decals gently off and just remove the paper from underneath it. And you have your beautiful decals. Companies actually sell the full decal so you know, you could actually remove all of the existing ones, all the imperfections, and completely restore them to a brand new state. Obviously, you know, this is just for aesthetics. So really, you don’t have to stress out about this last part. There are also restorers out there that would argue that it may actually not be necessary to return a machine to when it was first manufactured. But the decision is up to you.
Nicole
Are there any other parts or accessories you’d suggest restoring as part of the machine or your vintage sewing setup?
Esther
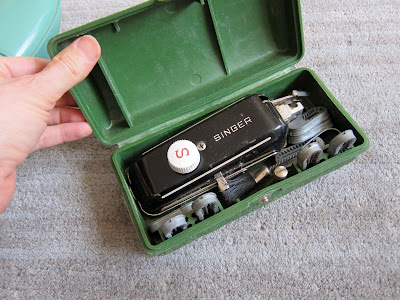
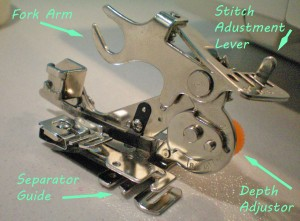
Besides the sewing machine itself, you may want to clean and service the accessories that comes with it. So we talked about vintage machines having some very unique presser feet that are mechanically actuated. So things like the buttonholer, the ruffler foot, there’s a possibility that a hinge or joint could benefit from the tiniest drop of oil just for maintenance. And if you have a treadle sewing machine like me, you can’t sew without at least oiling the joints of the treadle base, which is the cast iron assembly that holds up the cabinet where the machine sits. You also have the flywheel, the pedal and a lot of the other parts that could see some oil love as well. Recently, I’ve heard that there are China made replicates that have surfaced of the cast iron legs. And quite honestly, I’ve seen negative reviews of them that claim that they’re not worth the money. I just, you know, I’m just reporting what I’ve seen, I don’t really have any opinions on it. So you know, if you don’t want to buy random sets, or you see some that’s floating around garage sales, or whatever, some people will spray paint them for aesthetics reasons, but if you do intend to keep some of the rust off, I would recommend taking the irons to a shop that would sandblast the old stuff off and powder coat them. But again, that takes a lot of money and time. It depends on how far you’re willing to go with restoring it. Other things that you would want to think about is the wood items that comes with the machine. Those could definitely use some tender love and care as well. So the wood usually do come in pretty dry and flaky state. You’ll see finishes that may have scratches or watermarks, the wood items would include wooden box space for the machines to rest, on the sewing machine cases that have like a key to lock it up. And then also the cabinet obviously for the treadle machines. I’ve heard that the bentwood case, which is a upside down U shaped sewing machine case cover that seems to be quite sought after in pristine conditions. And my Singer 66 actually comes with a cabinet that has a veneer finishing. It wasn’t in terrible condition. So I really only gently wiped it down with a damp cloth and sealed in the chipped edges with some wood conditioner. Just for the time being. I really just haven’t had the time to research and learn how to restore it properly. It’s a whole world of antique furniture restoration that, quite honestly, I’m not ready to explore right now. But it’s definitely one of my next steps for restoring this machine.
Nicole
Of course. And if you really don’t want to go into all the effort of restoring a vintage sewing machine, there’s always an option to purchase them fully restored too, right.
Esther
Yeah, so there are machines, you know, as we’ve mentioned before in a variety of conditions on the market. It’s definitely possible to find machines that are already restored. My main suggestion here is to ask plenty of questions about the machine condition, get pictures or videos of it sewing. If that’s even moving at all. It’ll be pretty evident too if the seller really knows how the sewing machine works, assuming the seller did the restoration. And if you really don’t have the confidence to restore a vintage sewing machine or you just don’t want to risk finding a mystery condition machine and want a professionally quote, restored machine. It’s definitely worthwhile to search for a vintage sewing machine enthusiast who may be downsizing their collection or reputable vintage selling machine restorers. But you do have to expect to pay the price. According to Erica, who’s very well informed in the VSM world, if one wants a fully restored vintage machine with original accessories expect to pay at least $150 to $250 Canadian local pickup only. The price of Singer featherweights are generally $300 to $600. And the free arm version for the Featherweight generally goes for $2,000 USD. Again, those are prices in North America, it may look different depending on your geographic location.
Nicole
I think for someone like me who like isn’t into tinkering but that’s the best way to put it. You know, I pay you know, for something that’s fully restored, I understand the value of labor. And if I’m not doing it, someone else is doing it and you know, probably doing it better than I would do so I get it. And you know, listeners, if you’re more interested in secondhand sewing machines, and don’t necessarily feel drawn toward vintage sewing machines, which is kind of where I’m at right now, there are definitely options for you. If you’re in the market for a secondhand or used machine, particularly computerized machines, a good place to start is an authorized dealer or a sewing machine repair center if there are any local to you. These machines are generally refurbished or trading machines that folks have brought in because they bought a new one. And if that’s not a possibility, you can use the same advice we’ve shared in the episode about buying a vintage machine. We always recommend testing the machine out or looking at the model number to see what others have experienced with it, or to learn more about how it works and if it’ll fit into your sewing style. So thank you so much, Esther, for sharing all of your expertise with us. You’ve also put together some fantastic show notes as the producer for this episode with a comprehensive guide to everything we’ve talked about today. So listeners, we definitely suggest you check them out.
Ada
Thank you Esther. So there are so many vintage sewing machines out there and not enough podcast episodes or time to cover the topic. We have definitely barely scratched the surface here, but we hope the show notes are enough of a guide to get anyone interested in vintage sewing machines started. Thank you so much for joining us on this week’s episode of the Asian Sewist Collective podcast. If you like our show, please consider supporting us on Ko-fi. Your financial support helps us with overhead expenses and allows us to give back to our all-volunteer team. You can make a monthly or one time donation at ko-fi.com/asiansewistcollective. You can find this link in our show notes, on our website and on our Instagram account. Check us out on Instagram, @asiansewistcollective. That’s one word, asiansewistcollective. You can also help us out by spreading the word and telling your friends. We would appreciate it if you could rate, review and subscribe to this podcast on Apple Podcasts, Google Podcasts PocketCasts or wherever you get your podcasts.
Nicole
All of the links and resources mentioned in today’s episode will be in the show notes on our website. That’s AsianSewistCollective.com And we’d love to hear from you. Email us with your questions, comments or even voice messages if you want to be featured on future episodes at AsianSewistCollective@gmail.com. This episode was brought to you by your co host Ada Chen and Nicole Angeline. This episode was researched by Erica Y and Eileen Leung, produced by Esther Lee, and edited by Serena Granger and Henry Wong. Thank you so much to the other members of our collective who made this week’s episode a reality. This is the Asian Sewist Collective podcast and we’ll see you next week.